☕ Elevate your coffee ritual—brew bold, brew personal, brew smart!
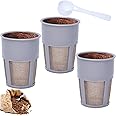
The Keurig My K-Cup Universal Reusable Filter features MultiStream Technology for optimal flavor extraction, fits all Keurig home brewers, and is dishwasher safe and BPA-free. Designed exclusively for ground coffee, it offers an eco-friendly alternative to single-use pods without compromising taste.
| Shape | Basket |
| Material | Plastic |
A**R
Works like a gem!
We have a Keurig 2.0 K250 plus. This works perfectly with our machine. Using it gives us the full options of sizes from one liter carafe down to 4 oz. When you desire to add coffee to it, take the filter out of its black case and the fill the filter. The outward black case is rounded on the bottom and is not made to stand on its own. The filter is flat on the bottom and can easily stand on its own. Once you put your coffee in your filter, then put the filter back in its black case, and put the grey lid on top and turn it to lock it down. Then pop the whole thing in your Keurig and choose the ounces of you want. Ours makes great coffee. If you do not care for any coffee “sludge” at the bottom of your cup, then use coarse ground coffee instead of finely ground coffee. I don’t mind the “sludge” myself. It makes my coffee stronger. We love this thing. I suggest buying two so that you always have a cool one to deal with. It’s pretty hot after it makes coffee obviously. Our machine requires the use of the grey handle looking thing. We give it 5 stars.
G**N
Makes a nice quick cup of coffee
Pleasantly surprise once I started using this after reading some of the reviews but it was cheap so I thought I’d give it a go. Easy to fill and set up and makes a good cup of coffee comparable to the more expensive k-cups. I still use the ready made pods and don’t mind having to swap out the original pod holder as it takes seconds. Once brewed, knock out the grounds into the bin and give it a quick swill under the faucet and you are ready to go next time.
T**E
Best tasting coffee you will make from a basic keurig.
I was going to only give this 4 stars due to how poorly the design is for the plus models (older keurig pro) needing the extra grey clip, as it is not particularly foolproof and took a few minutes to figure it out and it has to be taken apart every time (as the lid holds it in place and removing the lid makes it fall in) with the clip always falling back in and having to be retrieved from inside the housing of the brewer. Hence my low marks on easy to use. Not impossible nor difficult, but honestly if your making coffee you probably need it and this extra annoyances dont help.However that being said with high quailty grounds, man this thing makes some amazing coffee! So down here in Baton Rouge, Louisiana (better food than New Orleans so we know flavor around here) we use Community Coffee which is packaged right here in the city, it has a strong flavor almost an aquired taste (normal coffee tastes like burnt and flavorless to me since I am conditioned for it now). Most coffee pots as a carafe with paper filters brew it fine (what its designed for), the k cups for this brand is ok definitely not as good as grounds with paper filter as it seems k cups is an afterthought for Community. But using grounds in this adapter from the k cup side it blew everything out of the water in regards to taste and flavor. Worth every penny, and definitely worth the trouble. Im so excited for my coffee in the morning that even if the clip falls in I dont try to throw the adapter out the window any more.Had no idea coffee could taste so good. My technique for this is to use mid grinded coffee like is used in paper filters and keep it refrigerated until I am using it (dont leave it in the pot overnight), course ground is not enough flavor (but still good), yet fine ground lets too much through the mesh so mid ground gives best results. Yes people tell not to put in fridge due to "moisture" but really modern full sized fridges have at minimum a moisture reducer mode or something that can make some foods last longer so should be on anyway, but starting from cold grounds imparts far more flavor. You cant really do this with k cups as they will break at the seal if cold. The other thing is this adapter holds more grounds than needed, as you can brew 2 large or 3 small cups without losing much flavor, but any less than the max fill line some water does not get used in brewing and less flavor is imparted. Its better to fill to max fill line on adapter with grounds and make two cups with it (the second one set strong) than to try and add less grounds. I generally make 18-20oz of coffee in the morning, this is why I got this in the first place since using the same k cup twice really isnt that good tasting nor cheap, or two k cups for more cost than buying a coffee. I make the first 6-8oz on regular and the next 12oz on strong, works perfect on my 5yr old something model kerig pro but results may vary my guess is many may see similar results. I only replace the grounds after that 18-20oz or so, or I take out the whole adapter and pop it back into the fridge immediately after brewing for the next day if doing small cups. The second brew the next day believe it or not is still better than the k cup of this coffee brand specifically, but only if its refrigerated before brewing.My guess is refrigerated grounds really makes the difference here, but this adapter is very well designed specifically to make very good coffee even if it does have some shortcomings in other parts of its design. Its an acceptable tradeoff for those who consider the flavor of the coffee important.
E**R
Instructions bad, but makes great coffee. Just read my instructions
The instructions seem good at first glance but when you try to put it together, you find out that are confusing since this is their universal unit and the instructions are divided into whether you have a type 1 or type 2 coffee maker as if you know are supposed to know which kind. If you bought a new or recent model, you would logically think you have a type 2. Wrong! The older models are type 2 with the newer models being type 1! Older type 2 brewer require this adapter that goes on the bottom, you remove it for type 1, newer brewers. There is a warning sticker saying you need the adapter!. You don't! Then there is this white round sticker on the top which looks like it is something that should be removed but somewhere it says not to. These are the instructions for the Supreme Plus brewer but I think they are the same for all newer models. Now there are four pieces to the unit. There is the grey top with writing on it, the red thing that sits under the grey top (needed but can be removed for cleaning), the filter basket which fits into the plastic bottom. To assemble the unit, you first fill the filter basket with ground coffee to the line inside the filter basket (no need to tamp down), the fit the gray top with the red thing onto the filter basket, It just sit on the filter basket (it doesn't lock on like you might think but push it on tightly. Placement on the filter basket doesn't matter as long as it's on tight. You then place the grey top with the red thing underneath which is now on the filter basket into the black plastic bottom. Rotate the grey top, red insert, and filter basket unit until it drops down a little in place (there is a tab on top the black bottom which fits into this indent in the grey top). You will see a white dot on the bottom tab which will align with the unlock icon white dot on the grey top. Then you carefully turn the grey top slightly clockwise to lock it on the plastic bottom. It sort clicks in place so you know it's locked. The unit is now ready to go. You then align the white arrow on the grey top with the rear slot on the brewer basket holder then just drop the unit into the brewer hole (remove the pod holder basket before hand. It is held in place by this tab on the front on hook on the back, so just push it back slightly and it will lift out. No real force is required otherwise you will break it.) It does NOT snap into place or anything, it just sits there loose but should sit even and down. If it is not "down" you didn't align the three tabs on the filter basket with the three slots on the brewer basket holder and/or the plastic top is not firmly and even on the mesh filter basket. But if the unit sits flat and even, you just lower the top as usual and you are ready to go. While these instructions sound complicated, they are not in practice and after once or twice, you will be able to do it in your sleep. For cleaning after use, I took it apart, removed the red plastic thing and, after dumping out the used grounds, dropped all the pieces into a soapy glass of water, shook it, then rinsed every off. One note, when replacing the red thing, make sure all the holes in the grey top are sealed (the holes are symmetrical, put staggered, so check!). The good news, using Starbuck coffee, I found the coffee significantly better with this filter unit than using their pods (which were pretty good). I used Starbucks coffee since it was easy to compare against the "real thing" from their stores.
Trustpilot
2 weeks ago
2 months ago